A few recommended links to read about AD Domain services:
- Active Directory Domain Services
- What are domain and Forests?
- How Domain and Forests work?
- How the Active Directory Schema works?
- How the Global Catalog works
A few basic definitions retrieved from here that I believe are important to understand before promoting our server:
Components of the Active Directory Logical Structure
| Elements | Description |
|---|---|
Organizational Units (OUs)
|
Organizational units are container objects. You use these container objects to arrange other objects in a manner that supports your administrative purposes. By arranging objects in organizational units, you make it easier to locate and manage them. You can also delegate the authority to manage an organizational unit. Organizational units can be nested in other organizational units.
You can arrange objects that have similar administrative and security requirements into organizational units. Organizational units provide multiple levels of administrative authority, so that you can apply Group Policy settings and delegate administrative control. This delegation simplifies the task of managing these objects and enables you to structure Active Directory to fit your organization’s requirements.
|
Domains
|
Domains are container objects. Domains are a collection of administratively defined objects that share a common directory database, security policies, and trust relationships with other domains. In this way, each domain is an administrative boundary for objects. A single domain can span multiple physical locations or sites and can contain millions of objects.
|
Domain Trees
|
Domain trees are collections of domains that are grouped together in hierarchical structures. When you add a domain to a tree, it becomes a child of the tree root domain. The domain to which a child domain is attached is called the parent domain.
A child domain might in turn have its own child domain. The name of a child domain is combined with the name of its parent domain to form its own unique Domain Name System (DNS) name such as Corp.nwtraders.msft. In this manner, a tree has a contiguous namespace.
|
Forests
|
A forest is a complete instance of Active Directory. Each forest acts as a top-level container in that it houses all domain containers for that particular Active Directory instance. A forest can contain one or more domain container objects, all of which share a common logical structure, global catalog, directory schema, and directory configuration, as well as automatic two-way transitive trust relationships. The first domain in the forest is called the forest root domain. The name of that domain refers to the forest, such as Nwtraders.msft. By default, information in Active Directory is shared only within the forest. In this way, the forest is a security boundary for the information that is contained in that instance of Active Directory.
|
Site Objects
|
Sites are leaf and container objects. The sites container is the topmost object in the hierarchy of objects that are used to manage and implement Active Directory replication. The sites container stores the hierarchy of objects that are used by the Knowledge Consistency Checker (KCC) to effect the replication topology. Some of the objects located in the sites container include NTDS Site Settings objects, subnet objects, connection objects, server objects, and site objects (one site object for each site in the forest). The hierarchy is displayed as the contents of the Sites container, which is a child of the Configuration container.
|
Logical Sections (Partitions) of the Active Directory DS Database
| Partition | Description |
|---|---|
Schema
|
The schema partition contains the forest-wide schema. Each forest has one schema so that the definition of each object class is consistent. The schema is the formal definition of all object and attribute data that can be stored in the directory. Active Directory domain controllers include a default schema that defines many object types, such as user and computer accounts, groups, domains, organization units, and security policies. Administrators and programmers can extend the schema by defining new object types and attributes or by adding new attributes for existing objects. Schema objects are protected by access control lists, ensuring that only authorized users can alter the schema. The schema partition is replicated to each domain controller in the forest.
|
Configuration
|
The configuration partition describes the topology of the forest as well as other forest, domain and domain controller settings. This configuration data includes a list of all domains, trees, and forests and the locations of the domain controllers and global catalogs. The configuration partition is replicated to each domain controller in the forest.
|
Application
|
Applications and services can use application directory partitions to store application-specific data. Data stored in the application directory partition is intended to satisfy cases where information needs to be replicated but not necessarily on a global scale. Application directory partitions can contain any type of object, except security principals. Application directory partitions are usually created by the applications that will use them to store and replicate data. One of the benefits of an application directory partition is that, for redundancy, availability, or fault tolerance, the data in it can be replicated to different domain controllers in a forest. The data can be replicated to a specific domain controller or any set of domain controllers anywhere in the forest. This differs from a domain directory partition in which data is replicated to all domain controllers in that domain.
Only domain controllers running Windows Server 2003 or higher can host a replica of an application directory partition. Application directory partitions are created, configured, and managed by the administrator.
|
Promoting Server to a Domain Controller
If you are still on the window from figure 1 below, click on "Promote this server to a domain controller" option to start the process. If not, open the Server Manager > Dashboard, and on the top right you will see a yellow triangle that will show a message which after clicking on it will tell you that you have post-deployment configurations waiting to be completed. One of them will be "Promote this server to a domain controller".
 |
| Figure 1. Roles and features installed successfully. Next, promoting server to a domain controller. |
You will have to select the deployment operation. By default, the first option "Add a domain controller to an existing domain" will be selected. However, since this is the first domain controller being deployed in your environment and no forest or domain have been set up yet, you will have to select the option "Add a new forest".
 |
| Figure 2. Selecting the deployment operation. |
After selecting "Add a new forest", you will have to specify the name of your root domain and click Next.
 |
| Figure 3. Selecting the deployment operation and specifying our root domain name. |
Now, it will ask you to set the function levels of the forest and domain.
- The functional levels go back up to Windows Server 2003
- If you think you will have a Windows Server 2008 in your environment in the future, then you will have to select Windows Server 2008.
- Ask yourself, What is the oldest domain controller I will have in my environment?
The next section asks you to specify the domain controller capabilities and it will be all grayed out because you are setting up the first fully functional Domain Controller in your environment.
 |
| Figure 4. Selecting functional levels and domain controller capabilities. |
Type the Directory Services Restore Mode (DSRM) password. DSRM allows an administrator to repair or recover to repair or restore an Active Directory database.
 |
| Figure 5. Typing DSRM password. |
Ignore the warning message and click Next. "If you are integrating with an existing DNS infrastructure, you should manually create a delegation to this DNS server in the parent zone to ensure reliable name resolution from outside the domain. Otherwise no action is required. If you are not concerned that people in other domains or on the Internet will not resolve DNS name queries for computer names in the local admin, you can disregard the message" [Source]
 |
| Figure 6. Ignoring delegation warning. |
The NetBIOS domain name gets filled out automatically. Click Next.
 |
| Figure 7. NetBIOS domain name. |
Active Directory is a database so it will ask you where the information should be stored. Nothing particular wrong with the defaults.
 |
| Figure 8. Specifying the location of the AD DS database, log files, and SYSVOL. |
Review your selections. All your settings can be exported to a Windows PowerShell script to automate additional installations. Just click "View script" if you want to. Once you are done reviewing your selections, click Next.
 |
| Figure 9. Reviewing selections before clicking next. |
As you can see in figure 10 below, all prerequisite checks passed successfully, and you can click "Install" to begin the installation. However, you will also see warning messages with the yellow triangles to the left. Don't worry about those, and click "Install".
 |
| Figure 10. Prerequisites Check. |
Installation progress. Ignore warning...
 |
| Figure 11. Installation progress. |
 |
| Figure 12. Installation progress. |
Your server will automatically restart because Active Directory Domain Services were installed. Once it comes back up, log on and go to your Server Manager > Dashboard to check the remaining warning messages.
 |
| Figure 13. Restarting computer automatically after AD DS installation. |
 |
| Figure 14. Logging back on. |
 |
| Figure 15. Server Manager Dashboard. |
As you can see in Figure 16 below, we still have one remaining task "Complete DHCP configuration". Before you click on Complete DHCP Configuration, lets switch our server to our Virtual LAN in order to obtain an IP address from our 172.18.39.1/24 network and also be able to configure our PfSense to disable its DHCP services.
 |
| Figure 16. Server Manager Local Server properties. Remaining Task. DHCP Configuration. |
Setting up your own DHCP Server
Set a static IP address to your server
First, start by switching the port group in your Windows Server 2012 Network Adapter. Make sure it is set to Virtual LAN as shown in Figure 17 below. (Right click on your VM > Edit settings)
 |
| Figure 17. Setting Network Adapter to port group Virtual LAN. |
Go back to your windows server console, and set your network adapter with a static IP.
 |
| Figure 18. Network and Sharing Center. |
 |
| Figure 19. Accessing properties information of your network adapter. |
 |
| Figure 20. Internet Protocol Version 4 (TCP/IPV4) properties. |
 |
| Figure 21. IPv4 general information. Empty. |
You can check what IP your PfSense assigned to your server and use it for your static configuration.
 |
| Figure 22. Checking current IP assigned by PfSense. |
Set the following information:
- IP address: IP assigned by PfSense (172.18.39.2)
- Subnet mask: you can keep the default 255.255.0.0. You can change it later to /24
- Default Gateway: PfSense's IP address (172.18.39.1.1). Remember our PfSense will still be our router to allow us to talk to our Home network, VM network (Virtual WAN) and our home router to go out to the Internet.
- Preferred DNS server: Our Windows Server is our DNS server too so set it to its own IP (172.18.39.2). This will help to auto-populate some fields when we set our DHCP server.
- Alternate DNS server: set it to your home router's IP.
 |
| Figure 23. Setting IP statically. |
Next, browse to your Pfsense web interface and log on in order to disable its DHCP service.
 |
| Figure 24. Logging on to PfSense. |
 |
| Figure 25. PfSense Status Dashboard. |
Depending how big your screen is, you will have either three white lines on the top right as shown in figure 25 below or all the options on the top of your screen as shown in figure 27 below too.
 |
| Figure 26. DHCP server under services option. |
 |
| Figure 27. DHCP server under services option. |
The check box between "Enable" and "Enable DHCP server on LAN interface" will be checked. All you have to do is click on the check box one more time, scroll all the way down and click save. You will get a green message that says "The changes have been applied successfully" as shown below in figure 28.
 |
| Figure 28. Saving changes to PfSense. DHCP server disabled. |
Open your options again and select Diagnostics>Reboot.
 |
| Figure 29. Rebooting PfSense via its web interface. |
Completing DHCP Configuration
Go back to your Server Manager > Dashboard and click on the top right yellow triangle to show your warning messages or remaining tasks. You will see again "Complete DHCP configuration". It is time to click on it now.
 |
| Figure 30. Complete DHCP configuration. |
Click Next to start.
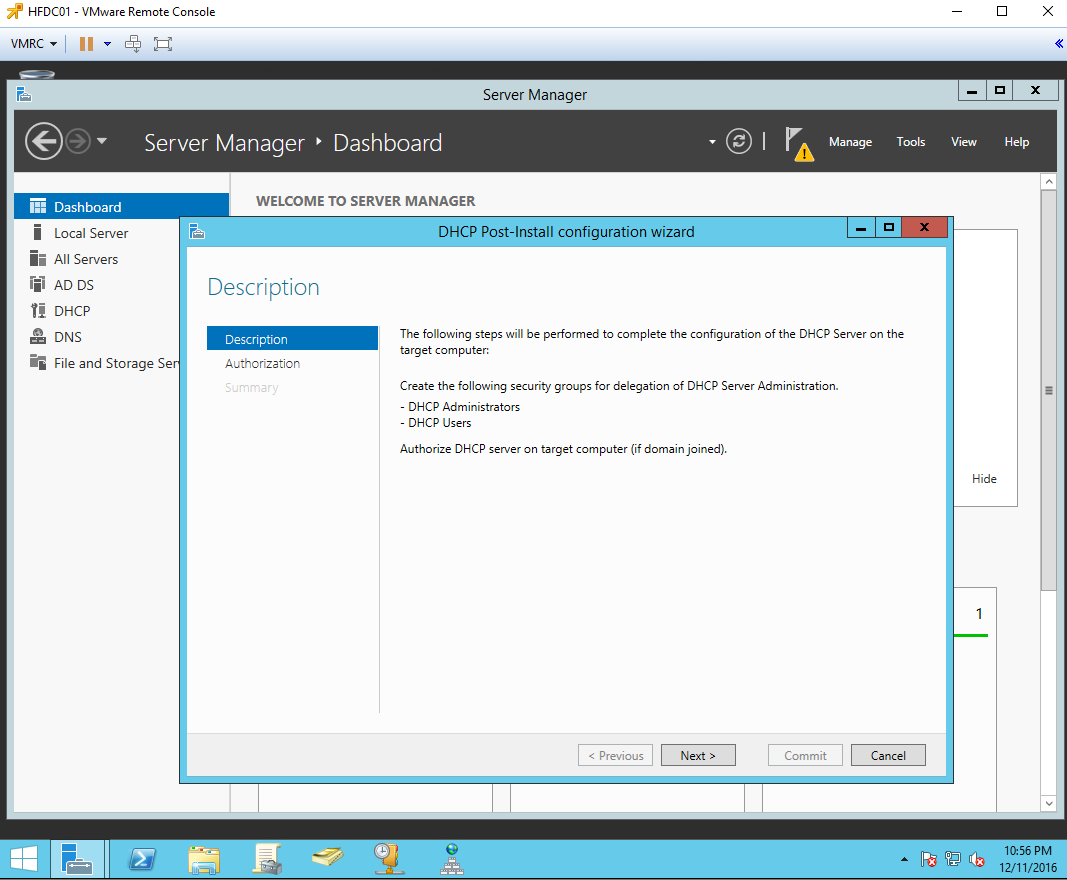 |
| Figure 31. DHCP Post install configuration wizard - Description. |
Select which credentials you will use. You can leave the defaults, click commit and then close.
 |
| Figure 32. Specifying credentials to be used to authorize the DHCP server in AD DS. |
 |
| Figure 33. Status of the post install configurations steps. |
 |
| Figure 34. Tasks completed. |
Next, we have to create a new scope for our environment.
- Click on the option tools and select DHCP
- expand the options below the name of your server (mine hfdc01.hf.com)
- expand IPv4, right click on it and select "New Scope"
 |
| Figure 35. Select DHCP tools. |
 |
| Figure 36. DHCP dashboard. |
 |
| Figure 37. Create a new scope. |
When the New Scope Wizard starts, click Next.
 |
| Figure 38. New scope wizard. |
Type a name and description for the scope.
 |
| Figure 39. Typing name and description of the new scope. |
Set your IP Address Range and subnet mask. Set it to your own needs.
 |
| Figure 40. Setting the IP range of the environment. |
Leave "Exclusions and Delay" and "Lease Duration" the way it is and click next. This is also up to you.
 |
| Figure 41. Exclusions and Delay. |
 |
| Figure 42. Lease Duration. |
Next, you will have to set up the IP address of routers (default gateways) and DNS servers. Click yes to do all that.
 |
| Figure 43. Do you want to configure the DHCP options for this scope now? |
For the IP address of the router. Do not type your Home Router's IP. This is your PfSense. Remember that your PfSense is the gate between Virtual LAN and Virtual WAN.
 |
| Figure 44. Setting IP address of a router. PfSense. |
 |
| Figure 45. Setting IP address of a router. PfSense. |
Specify your Parent Domain and the DNS servers on the network. Remember that the DNS servers are your Windows Server 2012 DC's IP and your Home Router's IP. That should be already filled out. If not, add those values to it.
 |
| Figure 46. Domain Name and DNS servers IP |
Leave WINS servers option as it is and click next.
 |
| Figure 47. WINS Server option. |
Activate your new scope. Select Yes, click Next and Finish.
 |
| Figure 48. Accept activation of scope. |
 |
| Figure 49. New Scope activated successfully. |
If you have another windows VM already in your environment and does not have an IP assigned to it, you can verify if your new DHCP server assigns IP addresses properly by typing ipconfig /renew. As you can see in Figure 50 below, my Windows 7 obtained an IP address from the range set during the activation of the new scope (172.18.39.100). If you do not have any other VMs in your environment, do not worry, as soon as you add a computer, your DHCP server it will assign an IP to it the same way how PfSense was doing it before.
 |
| Figure 50. Obtaining an IP from our DHCP server. |
 |
| Figure 51. Selecting location for our hf.com network. |
Now, if you check your DHCP server console and refresh it, you will see that there is a new lease created.
 |
| Figure 52. New lease. |
You can also test if your PfSense is still handling traffic to your home network and the Internet properly by pinging google.com.
 |
| Figure 53. Testing access to the Internet from our Virtual LAN. |
Awesome! Everything is working as expected. We have our virtual network configured properly and our Domain Controller configured to handle Active Directory Domain services and other services such as DNS and DHCP. In the next post, I will show you how to create organizational units, users, groups, GPOs, and join computers to our domain.
Feedback is greatly appreciated! Thank you.
Just wanted to tell you that you're doing a great job with these tutorials. Much appreciated as I'm setting up my environment following your guide.
ReplyDeleteHey Chad Mika! Thank you very much for the feedback! It makes me happy to hear that the tutorials are helping others to set their environment too. Let me know if you have any questions or if you think that we can add anything to the tutorials! I hope you have a good weekend.
DeleteI got my already programmed and blanked ATM card to withdraw the maximum of $1,000 daily for a maximum of 20 days. I am so happy about this because i got mine last week and I have used it to get $20,000. Mike Fisher Hackers is giving out the card just to help the poor and needy though it is illegal but it is something nice and he is not like other scam pretending to have the blank ATM cards. And no one gets caught when using the card. get yours from Mike Fisher Hackers today! *email cyberhackingcompany@gmail.com
DeleteWhat has your government done to help save you from your financial instability? you strive to survive and yet you hear stories of how your leaders have become terror in your entities... is time to make a different. for will have made money, and we have also come to help you out from your long time of financial suffering. clearing of credit card is made available, software for hacking ATM machines, bank to bank hacking and transfer, change your school grade and become something useful in the society. we also have other form of services such as Facebook hack, whats-app hack, twitter hack, i cloud hack, tracking of smart phones, hacking CCTV, installation of software on desktop and PC, snap-chat hack, Skype hack, wire wire, bitcoin account hack, erase your criminal record and be free for ever. database hack and many more. e-mail: cyberhackingcompany@gmail.com for your genuine hacking services and we shock we your findings.
Delete**SSN FULLZ WITH HIGH CREDIT SCORES AVAILABLE**
Delete>For tax filling/return
>SSN dob DL all info included
>For SBA & PUA filling
>Fresh spammed & Fresh database
**TOOLS & TUTORIALS AVAILABLE FOR HACKING SPAMMING CARDING CASHOUTS CLONING**
=>Contact 24/7<=
Telegram > @leadsupplier
ICQ > 752822040
Skype > Peeterhacks
Wickr me > peeterhacks
FRESHLY SPAMMED
VALID INFO WITH VALID DL EXPIRIES
*All info included*
NAME+SSN+DOB+DL+DL-STATE+ADDRESS
Employee & Bank details included
CC & CVV'S ONLY USA AVAILABLE
SSN+DOB
SSN+DOB+DL
High credit fullz 700+
(bulk order negotiable)
*Payment in all crypto currencies will be accepted
->You can buy few for testing
->Invalid info found, will be replaced
->Serious buyers contact me for long term business & excellent profit
->Genuine & Verified stuff
TOOLS & TUTORIALS AVAILABLE FOR
(Carding, spamming, hacking, scripting, scam page, Cash outs, dumps cash outs)
=>Ethical Hacking Tools & Tutorials
=>Kali linux
=>Facebook & Google hacking
=>Bitcoin Hacking
=>Bitcoin Flasher
=>SQL Injector
=>Bitcoin flasher
=>Viruses
=>Keylogger & Keystroke Logger
=>Logins Premium (Netflix, coinbase, FedEx, PayPal, Amazon, Banks etc)
=>Bulk SMS Sender
=>Bitcoin Cracker
=>SMTP Linux Root
=>DUMPS track 1 and 2 with & without pin
=>Smtp's, Safe Socks, rdp's, VPN, Viruses
=>Cpanel
=>PHP mailer
=>Server I.P's & Proxies
=>HQ Emails Combo (Gmail, yahoo, Hotmail, MSN, AOL, etc)
->Serious buyers are always welcome
->Big discount in bulk order
->Offer gives monthly, quarterly, half yearly & yearly
->Hope we do a great business together
CONTACT 24/7
Telegram > @leadsupplier
ICQ > 752822040
Skype > Peeterhacks
Wickr me > peeterhacks
Nice one, I guess we just need to stop for a brief moment and read through. I dont read that much but I really had some good time grabbing some knowledge. Still I am out to speak and propose you exotic stuffs like
ReplyDeleteexotic carts official
buy exotic carts
buy exotic carts online.
exotic carts review
exotic carts website
gorilla glue exotic carts.
exotic carts fake
kingpen official
kingpen review.
mario carts official
mario carts online
exotic carts website
exoticcartsofficial
exotic carts for sale
exotic carts thc
exotic cartridges
exotic carts flavors
@exoticcartsofficial
real exotic carts
exotic carts vape cartridges
exotic cart
exotic carts vape pen
mario kart cartridge
king pen battery
exoticcarts
exotic carts official website
supreme cartridges
mario carts cartridges
exotic carts review
710 kingpen gelato
710 king pen battery
supreme cartridge
supreme brand oil cartridge
what are exotic carts
what are pre roll
what are dabwoods
ReplyDeleteBuy adderall
Buy Xanax
Buy Methamphetamine
Buy alprazolam powder
Buy oxycontin
Buy Ketamine
There couple of fascinating points on time in this article but I do not determine if I see these people center to heart. You can find some validity but I am going to take hold opinion until I check into it further. Excellent write-up , thanks and we want a lot more! Combined with FeedBurner too managed security services Raleigh
ReplyDeleteAmazing post. I’m a regular visitor to your site and appreciate you taking the time to keep the superb website. I’ll be a regular visitor for quite a while. Kindly Visit our Website:- Reset Roadrunner Email Password
ReplyDelete**SSN FULLZ WITH HIGH CREDIT SCORES AVAILABLE**
ReplyDelete>For tax filling/return
>SSN dob DL all info included
>For SBA & PUA filling
>Fresh spammed & Fresh database
**TOOLS & TUTORIALS AVAILABLE FOR HACKING SPAMMING CARDING CASHOUTS CLONING**
=>Contact 24/7<=
Telegram > @leadsupplier
ICQ > 752822040
Skype > Peeterhacks
Wickr me > peeterhacks
FRESHLY SPAMMED
VALID INFO WITH VALID DL EXPIRIES
*All info included*
NAME+SSN+DOB+DL+DL-STATE+ADDRESS
Employee & Bank details included
CC & CVV'S ONLY USA AVAILABLE
SSN+DOB
SSN+DOB+DL
High credit fullz 700+
(bulk order negotiable)
*Payment in all crypto currencies will be accepted
->You can buy few for testing
->Invalid info found, will be replaced
->Serious buyers contact me for long term business & excellent profit
->Genuine & Verified stuff
TOOLS & TUTORIALS AVAILABLE FOR
(Carding, spamming, hacking, scripting, scam page, Cash outs, dumps cash outs)
=>Ethical Hacking Tools & Tutorials
=>Kali linux
=>Facebook & Google hacking
=>Bitcoin Hacking
=>Bitcoin Flasher
=>SQL Injector
=>Bitcoin flasher
=>Viruses
=>Keylogger & Keystroke Logger
=>Logins Premium (Netflix, coinbase, FedEx, PayPal, Amazon, Banks etc)
=>Bulk SMS Sender
=>Bitcoin Cracker
=>SMTP Linux Root
=>DUMPS track 1 and 2 with & without pin
=>Smtp's, Safe Socks, rdp's, VPN, Viruses
=>Cpanel
=>PHP mailer
=>Server I.P's & Proxies
=>HQ Emails Combo (Gmail, yahoo, Hotmail, MSN, AOL, etc)
->Serious buyers are always welcome
->Big discount in bulk order
->Offer gives monthly, quarterly, half yearly & yearly
->Hope we do a great business together
CONTACT 24/7
Telegram > @leadsupplier
ICQ > 752822040
Skype > Peeterhacks
Wickr me > peeterhacks